The Silent Rotator: Understanding EXIF Orientation and How I Fixed It
While integrating a custom camera module for one of my client's projects, I ran into something that initially looked like a bug in my cropping logic but turned out to be one of the most quietly deceptive behaviors in mobile development: EXIF orientation. Images captured in portrait mode were showing up sideways in the preview. The camera looked fine, the UI was correct, but after the photo was taken, it came out rotated 90°. This post is a deep dive into why that happens and exactly how I fixed it.
What Is EXIF?
EXIF stands for Exchangeable Image File Format. It's a standard that specifies the metadata embedded inside image files — typically JPEGs — captured by cameras (including smartphone cameras). This metadata travels with the image and contains information such as:
- The date and time the photo was taken
- GPS coordinates
- Camera model and manufacturer
- Aperture, shutter speed, ISO
- And most importantly for us — Orientation
Think of EXIF as the invisible sticky note glued to every photo. The image pixels themselves don't change — only the note tells viewers how to interpret them.
What Is EXIF Orientation?
Here's the part that trips everyone up. Smartphone camera sensors have a natural (native) orientation — the direction they were designed to capture pixels in. On most Android and iOS devices, this native orientation is landscape. Yes, even when you hold your phone in portrait mode, the image sensor is physically capturing pixels as if the phone were sideways.
So how does your gallery app show the photo correctly upright? It reads the EXIF Orientation tag and rotates the image display accordingly. The pixel data is never touched — it's always stored in the sensor's native landscape format. The EXIF orientation tag is a polite instruction that says: "Hey, whoever reads this — please rotate me before displaying."
The EXIF Orientation Value Table
The EXIF spec defines 8 orientation values. Here are the most common ones you'll encounter in practice:
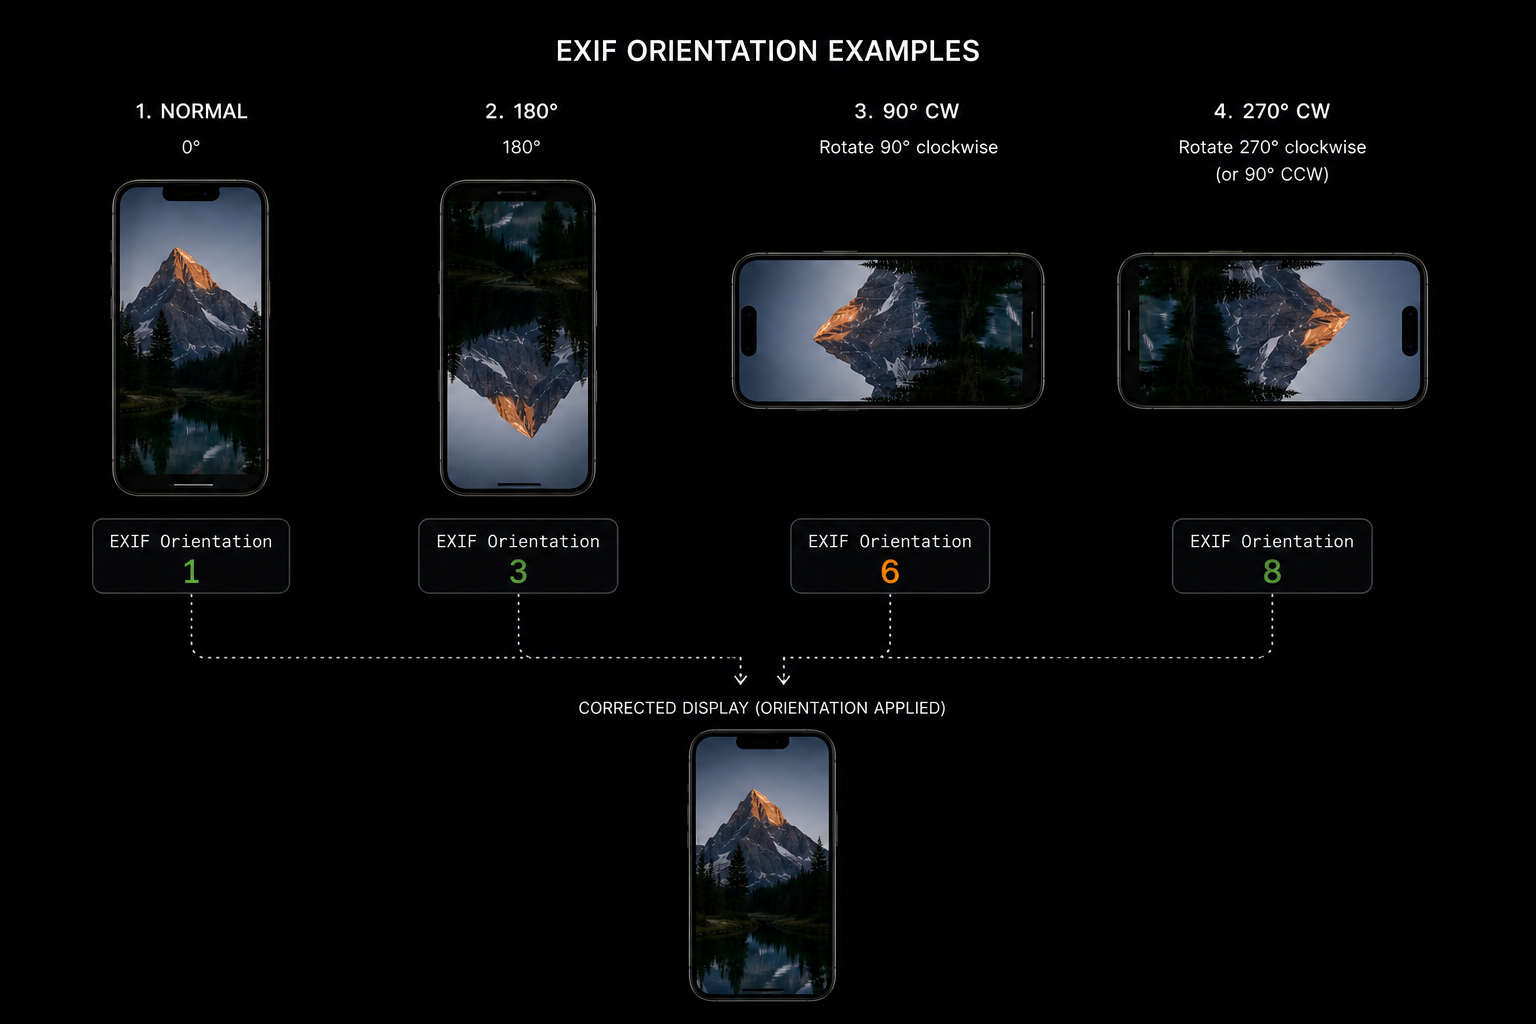
EXIF orientation values 1, 3, 6 and 8 — how each looks and how to correct it
| Value | Meaning | How to Correct |
|---|---|---|
| 1 | Normal (landscape, sensor-native) | No rotation needed |
| 3 | Rotated 180° | Rotate −180° |
| 6 | Rotated 90° CW (portrait, phone held upright) | Rotate +90° |
| 8 | Rotated 270° CW (phone held upside-down) | Rotate −90° |
The most common case in day-to-day use is orientation 6 — when you hold the phone upright and take a photo. The raw pixel data is landscape, but the EXIF tag marks it as "needs 90° clockwise rotation to display correctly."
Why Do Images Get Auto-Rotated?
The reason images appear rotated correctly in your gallery or iOS Photos app is that those apps are EXIF-aware. They read the tag and rotate the display. But here's the problem: not all environments honor EXIF metadata.
When you load an image into a React Native <Image> component, or pass the URI to a backend AI processing pipeline, you are often dealing with the raw pixel data — with the EXIF instruction being silently ignored. The result? Your portrait photo displays sideways, or your server-side crop calculates coordinates against a landscape image while your user sees a portrait one.
This is exactly the ghost that was haunting my camera module. The photo was being taken in portrait, the preview looked fine (because the OS gallery preview was handling the EXIF rotation), but once I passed the URI to my own image processing logic, the raw landscape pixels were being used — leading to completely wrong crop coordinates and a visually rotated final image.
What Happens Under the Hood
Here's the exact sequence of events that leads to this confusion:
- User holds phone in portrait (upright).
- Camera sensor captures a landscape image (sensor's natural orientation).
- The OS writes the EXIF tag:
Orientation: 6("rotate 90° CW to display correctly"). - The raw JPEG is stored with landscape dimensions, e.g., 4032×3024.
- Your gallery reads the EXIF tag, rotates the display — you see a portrait image.
- Your code reads
image.width = 4032, image.height = 3024(still landscape!). - Your crop math is now operating on a rotated coordinate system vs. what the user sees — chaos ensues.
The fix isn't to fight the EXIF system — it's to normalize the image at capture time. You bake the rotation into the actual pixel data so that no EXIF interpretation is needed downstream. What you see is what you get.
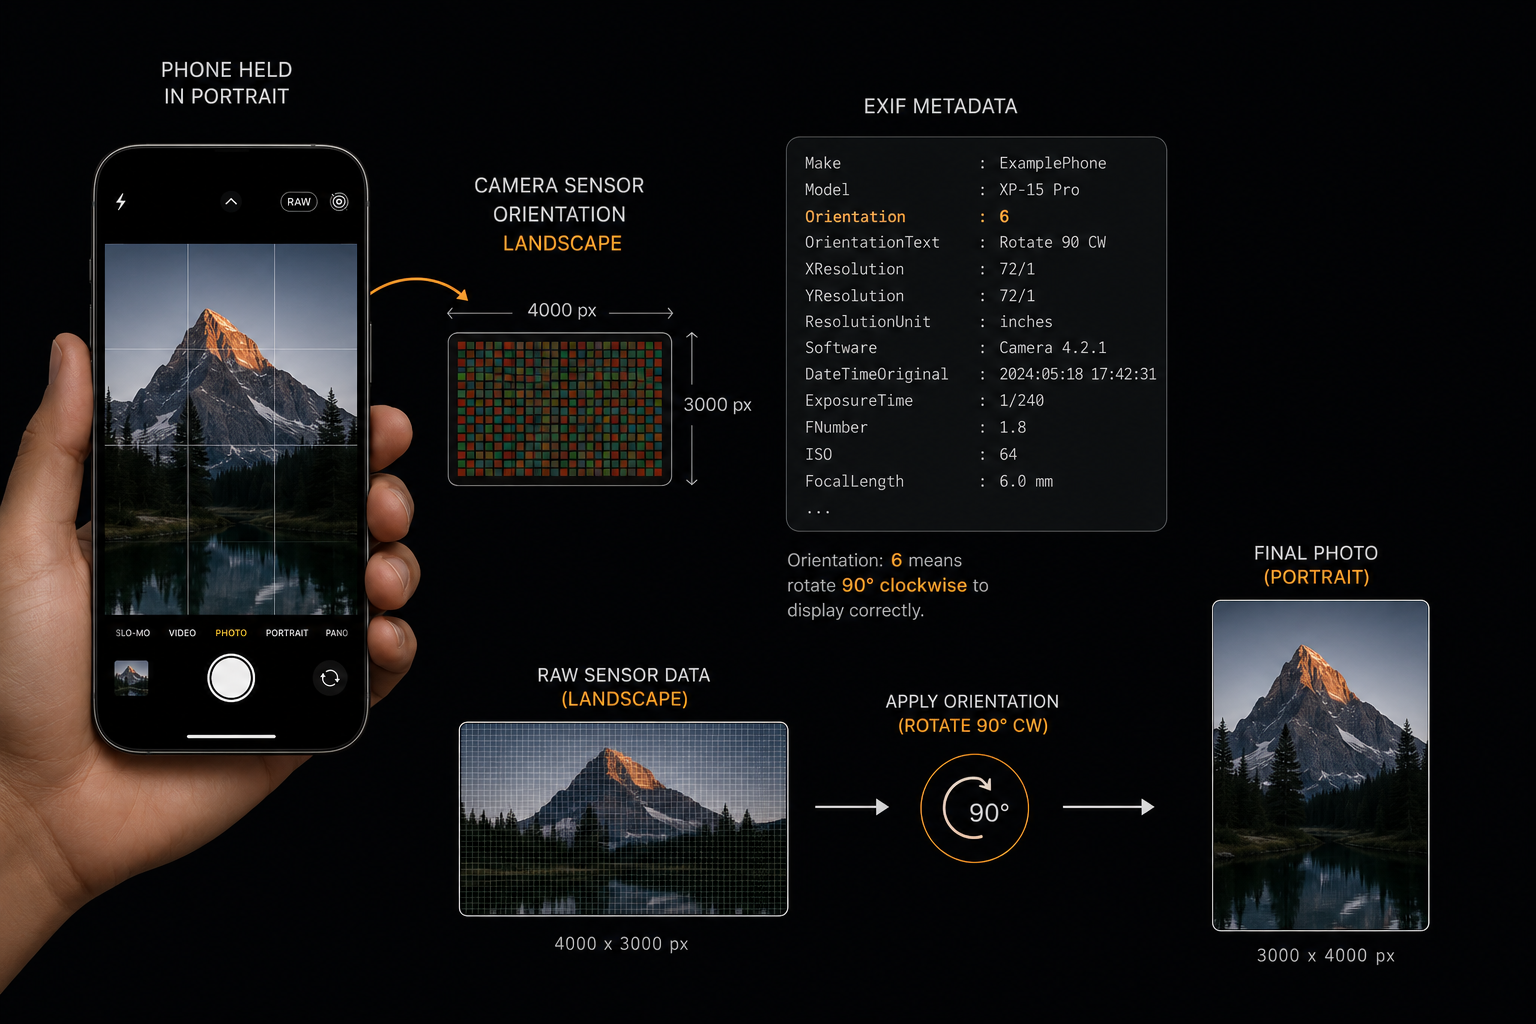
Phone held portrait → sensor captures landscape → EXIF tag instructs 90° CW rotation → correct portrait displayed
How I Fixed It
In the custom camera component for the app, I used expo-image-manipulator to normalize the image immediately after capture — before doing any cropping, resizing, or passing the URI downstream. Here's the relevant logic from the takePicture function:
const photo = await cameraRef.current.takePictureAsync({
  quality: 0.85,
  exif: true,  // Request EXIF metadata from the camera
});

if (photo) {
  // Step 1: Pass through ImageManipulator to normalize EXIF.
  // renderAsync() re-encodes the image — on some devices Expo
  // automatically applies the EXIF rotation here.
  const normalizedRef = await ImageManipulator
    .manipulate(photo.uri)
    .renderAsync();
  let normalized = await normalizedRef.saveAsync({
    compress: 0.9,
    format: SaveFormat.JPEG,
  });

  // Step 2: Read the EXIF orientation tag from photo metadata.
  // Defensively check both casings — device behavior varies.
  const orientation = Number(
    photo.exif?.Orientation ?? photo.exif?.orientation
  );

  // Step 3: Determine the physical rotation correction needed.
  let rotation = 0;
  if (orientation === 3) {
    rotation = -90; // 180° flipped — correct by -90°
  } else if (normalized.width > normalized.height) {
    // Image is still landscape-shaped after first pass.
    // Most common: orientation 6, phone held upright.
    rotation = 90;
  }

  // Step 4: Bake the rotation into the pixel data.
  if (rotation !== 0) {
    const correctedRef = await ImageManipulator
      .manipulate(normalized.uri)
      .rotate(rotation)
      .renderAsync();
    normalized = await correctedRef.saveAsync({
      compress: 0.9,
      format: SaveFormat.JPEG,
    });
  }

  // normalized.uri is now EXIF-clean and correctly oriented.
  // width/height now match what the user physically sees.
  setPreviewImageSize({ width: normalized.width, height: normalized.height });
  setPreviewUri(normalized.uri);
}
Breaking Down the Fix, Step by Step
- 1. Capture with EXIF enabled: We pass
exif: truetotakePictureAsyncso we can read the metadata immediately after capture. - 2. First pass through ImageManipulator: Simply rendering and saving the image through the manipulator resolves orientation on some devices where Expo has already handled EXIF internally — but it's not reliable alone, so we don't stop here.
- 3. Read the Orientation tag defensively: We check both
Orientationandorientationbecause different Android OEMs and Expo versions return the key with different casing. - 4. Use dimension as a fallback: Even if the EXIF tag is absent or already stripped, we check if
width > heightafter the first pass. A landscape-shaped image after a portrait capture is a dead giveaway that rotation is still needed. - 5. Bake the rotation: The
.rotate(rotation)call physically transforms the pixel data. The resulting JPEG has correct dimensions and carries no EXIF orientation ambiguity.
Why This Matters Beyond the Preview
In the app, after capture the image was cropped to a guide frame, resized to 1600px wide, and sent to a backend AI pipeline that analyzed the clothing item using CLIP embeddings. If the image arrived sideways, the model's visual understanding was completely off — it would see a shirt oriented as if lying on its side. The fix wasn't just cosmetic; it was fundamental to the entire feature working correctly.
Any time you perform server-side image processing, ML inference, coordinate-based cropping, or object detection — you must normalize orientation before sending the image. Never assume the receiving end is EXIF-aware.
Key Takeaways
- Camera sensors capture in their native (often landscape) orientation. EXIF tags are metadata instructions, not pixel transformations.
- Most galleries and OS viewers are EXIF-aware and auto-correct — this masks the bug during development.
- React Native's
<Image>, most backends, and ML pipelines will ignore EXIF orientation entirely. - Always normalize (bake the rotation into pixels) immediately after capture — before any downstream processing.
- Use both the EXIF tag and dimension comparison as complementary signals; device behavior is inconsistent across Android OEMs.
EXIF orientation is one of those invisible, silent gremlins that only appears in production when real users take real photos in the real world. The OS gallery covers for it so convincingly during development that it's easy to miss — until you ship. Now you know exactly where to look and how to fix it.
Thanks for reading.